As a developer, you can use OptaWeb Vehicle Routing to optimize your vehicle fleet deliveries. In this guide, you will create and run a sample OptaWeb Vehicle Routing application.
1. Introduction
1.1. What is OptaWeb Vehicle Routing?
The main purpose of many types of businesses is to transport various types of cargo. The goal of these businesses is to deliver a piece of cargo from the loading point to a destination and use its vehicle fleet in the most efficient way. This type of optimization problem is referred to as the vehicle routing problem (VRP) and has many variations.
OptaPlanner can solve many of these vehicle routing variations and provides solution examples. OptaPlanner enables developers to focus on modeling business rules and requirements instead of learning constraint programming theory. OptaWeb Vehicle Routing expands OptaPlanner’s vehicle routing capabilities by providing a reference implementation that answers questions such as these:
-
Where do I get the distances and travel times?
-
How do I visualize the solution on a map?
-
How do I build an application that runs in the cloud?
2. Quickstart
You can get up and running with OptaWeb Vehicle Routing in just a few steps. In this chapter you will download the OptaWeb Vehicle Routing distribution archive containing a binary build of OptaWeb Vehicle Routing. You will use a Bash script to run the binary without having to build the project.
2.1. Install Java 11 or higher
Java SE 11 or higher must be installed on your system before you can use OptaWeb Vehicle Routing.
| It is recommended that you install Java SE Development Kit (JDK) because it is necessary in order to build OptaWeb Vehicle Routing from the source. However, if you have a binary distribution of OptaWeb Vehicle Routing, you only need the Java SE Runtime Environment (JRE). |
-
To verify the current Java installation, enter the following command:
java -version -
If necessary, install OpenJDK 11.
-
To install OpenJDK 11 on Fedora, enter the following command:
sudo dnf install java-11-openjdk-devel -
To install OpenJDK on other platforms, follow instructions at https://openjdk.java.net/install/.
-
2.2. Download distribution archive
Download the OptaWeb Vehicle Routing distribution archive, available from the OptaPlanner website, to quickly evaluate OptaWeb Vehicle Routing without having to set up build tools.
| If you want to modify OptaWeb Vehicle Routing and build it yourself or contribute to upstream, see Development guide. |
-
Go to https://www.optaplanner.org/download/download.html and click the OptaWeb Vehicle Routing tab.
-
Click Download OptaWeb Vehicle Routing 8.24.1.Final.
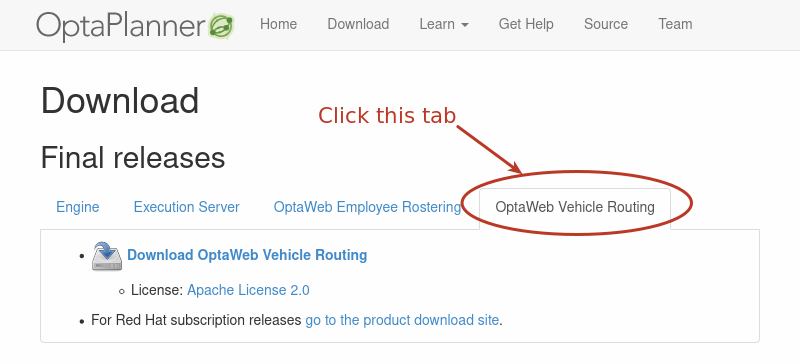 Figure 1. OptaPlanner download page
 -
Extract the downloaded distribution ZIP file. The archive contains source files and a binary build of OptaWeb Vehicle Routing as well as the OptaWeb Vehicle Routing documentation.
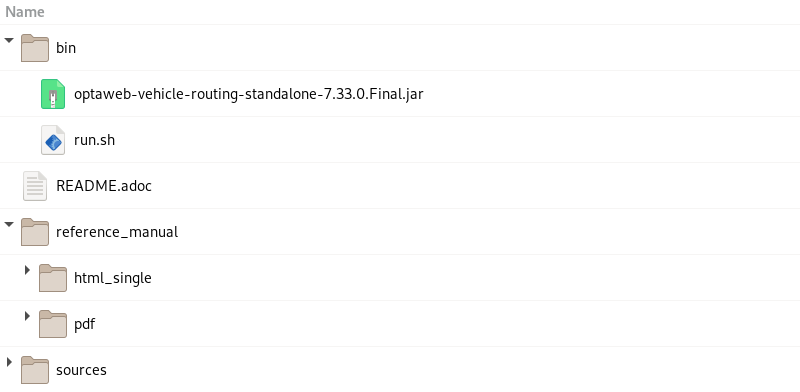 Figure 2. Content of the OptaWeb Vehicle Routing distribution archive
2.3. Run OptaWeb Vehicle Routing
After you download OptaWeb Vehicle Routing and extract the distribution archive, use the runLocally.sh script to run it.
If the standalone JAR is not part of the distribution, build the project from source by using the sources directory.
You can use the sources directory inside the distribution as if you have cloned the source repository from GitHub.
|
| If Bash is not available on your system, continue to Run locally without the script. |
-
Internet access is available. When OptaWeb Vehicle Routing runs it uses third-party public services such as OpenStreetMap to display map tiles and provide search results.
-
Java 11 or higher is installed.
-
OptaWeb Vehicle Routing distribution archive is downloaded and extracted.
Enter the following command:
./bin/runLocally.shThe script will download an OSM file that is needed to work with the sample data set that is included with the application. The script also has an interactive mode you can use to download additional regions. See Run locally using the script to learn more about the script.
3. Run locally using the script
Linux and macOS users can use a Bash script called runLocally.sh to run OptaWeb Vehicle Routing.
The script automates some setup steps that would otherwise have to be carried out manually.
The script will:
-
Create the data directory.
-
Download selected OSM files from Geofabrik.
-
Try to associate a country code with each downloaded OSM file automatically.
-
Build the project if the standalone JAR file does not exist.
-
Launch OptaWeb Vehicle Routing by taking a single region argument or by selecting the region interactively.
3.1. Quickstart mode
In quickstart mode, the script downloads the region that is required to work with the built-in data set. This is the easiest way to get started. To use the quickstart mode, run the script with no arguments.
-
optaweb-vehicle-routingrepository is cloned on your computer. -
Internet access is available.
-
Java 11 or higher is installed.
-
Change directory to the project root.
-
Run
./runLocally.sh. -
Confirm the download of the OSM file needed to work with the built-in data set.
The application starts after the OSM file is downloaded. Open http://localhost:8080 in a web browser to work with OptaWeb Vehicle Routing.
| The first start may take a few minutes because the OSM file needs to be imported by GraphHopper and stored as a road network graph. Subsequent runs will load the graph from the file system without importing the OSM file and will be significantly faster. |
3.2. Interactive mode
Using the interactive mode, you can see the list of downloaded OSM files and country codes assigned to each region. You can use the interactive mode to download additional OSM files from Geofabrik without visiting the website and choosing a destination for the download.
3.2.1. Download a new region using the script
-
Run
./runLocally.sh -i. -
Enter
dto show the download menu. -
Go to a region by entering its ID and then entering
e. -
Repeat the previous step until you see a list with the region you want to download.
-
Download a region by entering its ID and then entering
d.
|
Using large OSM files
For the best user experience, use smaller regions such as individual European or US states. Using OSM files larger than 1 GB will require significant RAM size and take a lot of time (up to several hours) for the initial processing. |
3.2.2. Select a region and run OptaWeb Vehicle Routing
-
Run
./runLocally.sh -i. -
Select a region from the list of downloaded regions by entering its ID.
-
Confirm the project build if it hasn’t been built yet.
-
Confirm starting OptaWeb Vehicle Routing using the selected region.
3.3. Non-interactive mode
Use the non-interactive mode to specify an existing region and start OptaWeb Vehicle Routing with a single command. This is useful for switching between regions quickly or when doing a demo.
Run ./runLocally.sh <REGION>.
3.4. Tweak the data directory
-
To use a different data directory, write its absolute path to the
.DATA_DIR_LASTfile at the project root. -
To change country codes associated with a region, edit the corresponding file under
DATA_DIR/country_codes/.For example, you could have downloaded an OSM file for Scotland, for which the script fails to guess the country code. In this case, set the content of
DATA_DIR/country_codes/scotland-latesttoGB. -
To remove a region, delete the corresponding OSM file from
DATA_DIR/openstreetmap/and GraphHopper directory fromDATA_DIR/graphhopper/.
4. Run locally without the script
Follow this section if you cannot use runLocally.sh to run OptaWeb Vehicle Routing because Bash is not available on your system.
4.1. Download routing data
The routing engine requires geographical data to calculate the time it takes vehicles to travel between locations. You must download and store OSM (OpenStreetMap) data files on the local file system before you run OptaWeb Vehicle Routing.
| The OSM data files are typically between 100 MB to 1 GB and take time to download so it is a good idea to download the files before building or starting the OptaWeb Vehicle Routing application. |
-
Open https://download.geofabrik.de/ in a web browser.
-
Click a region in the Sub Region list, for example Europe. The subregion’s page opens.
-
In the Sub Regions table, download the OSM file (
.osm.pbf) for a country, for example Belgium.
4.2. Create data directory structure
OptaWeb Vehicle Routing reads and writes several types of data on the file system.
It reads OSM (OpenStreetMap) files from the openstreetmap directory, writes a road network graph to the graphhopper directory, and persists user data in a directory called db.
Create a new directory dedicated to storing all of these data to make it easier to upgrade to a newer version of OptaWeb Vehicle Routing in the future and continue working with the data you created previously.
-
Create the
openstreetmapdirectory in your user accounthomedirectory, for example:$HOME/.optaweb-vehicle-routing └── openstreetmap -
Move all of your downloaded OSM files (files with the extension
.osm.pbf) to theopenstreetmapdirectory.
The rest of the directory structure will be created by the OptaWeb Vehicle Routing application when it runs for the first time. After that, your directory structure will look similar to the following example:
$HOME/.optaweb-vehicle-routing
├── db
│   └── vrp.mv.db
├── graphhopper
│   └── belgium-latest
└── openstreetmap
    └── belgium-latest.osm.pbf
4.3. Run using the java command
-
Internet access is available. When OptaWeb Vehicle Routing runs it uses third-party public services such as OpenStreetMap to display map tiles and provide search results.
-
Java 11 or higher is installed.
-
The data directory is created at
$HOME/.optaweb-vehicle-routing. -
A subdirectory called
openstreetmapwith at least one OSM file exists. -
A country code to use in search queries is identified.
Enter the following command:
java \
-Dapp.demo.data-set-dir=$HOME/.optaweb-vehicle-routing/dataset \
-Dapp.persistence.h2-dir=$HOME/.optaweb-vehicle-routing/db \
-Dapp.routing.gh-dir=$HOME/.optaweb-vehicle-routing/graphhopper \
-Dapp.routing.osm-dir=$HOME/.optaweb-vehicle-routing/openstreetmap \
-Dapp.routing.osm-file=belgium-latest.osm.pbf \
-Dapp.region.country-codes=BE \
-jar optaweb-vehicle-routing-standalone/target/quarkus-app/quarkus-run.jar
5. Run on OpenShift
Linux and macOS users can use the runOnOpenShift.sh Bash script to install OptaWeb Vehicle Routing on OpenShift.
5.1. Running on a local OpenShift cluster
Use Red Hat CodeReady Containers to easily set up a single-node OpenShift 4 cluster on your local computer.
You have successfully built the project with Maven.
-
To install CRC, follow the Red Hat CodeReady Containers Getting Started Guide.
-
When the cluster starts, perform the following steps:
-
Add the OpenShift command-line interface (
oc) to your$PATH:eval $(crc oc-env) -
Log in as
developer:oc login -u developer -p developer https://api.crc.testing:6443 -
Create a new project:
oc new-project project_name -
Run the script:
./runOnOpenShift.sh osm_file_name country_code_list osm_file_download_url -
Enter the following command for information about how to use the script:
./runOnOpenShift.sh --help
-
5.1.1. Updating the deployed application with local changes
Back end
-
Change the source code and build the back end module with Maven.
-
Start OpenShift build:
cd optaweb-vehicle-routing-backend
oc start-build backend --from-dir=. --follow
Front end
-
Change the source code and build the front end module with npm.
-
Start OpenShift build:
cd optaweb-vehicle-routing-frontend
oc start-build frontend --from-dir=docker --follow
6. Using OptaWeb Vehicle Routing
In the OptaWeb Vehicle Routing application, you can mark a number of locations on the map. The first location is assumed to be the depot. Vehicles must deliver goods from this depot to every other location that you marked.
You can set the number of vehicles and the carrying capacity of every vehicle. However, the route is not guaranteed to use all vehicles. The application uses as many vehicles as required for an optimal route.
The current version has certain limitations:
-
Every delivery to a location is supposed to take 1 point of vehicle capacity. For example, a vehicle with a capacity of 10 can visit up to 10 locations before returning to the depot.
-
Setting custom names of vehicles and locations is not supported.
6.1. Creating a route
To create an optimal route, use the Demo tab of the user interface.
-
Click Demo to open the Demo tab.
-
Use the blue and buttons above the map to set the number of vehicles. Each vehicle has a default capacity of 10.
-
Use the button on the map to zoom in as necessary.
Do not double-click to zoom in. A double click also creates a location.
-
Click a location for the depot.
-
Click other locations on the map for delivery points.
-
If you want to delete a location:
-
Hover the mouse cursor over the location to see the location name.
-
Find the location name in the list in the left part of the screen.
-
Click the icon next to the name.
-
Every time you add or remove a location or change the number of vehicles, the application creates and displays a new optimal route. If the solution uses several vehicles, the application shows the route for every vehicle in a different color.
6.2. Viewing and setting other details
You can use other tabs of the user interface to view and set additional details.
-
In the Vehicles tab, you can view, add, and remove vehicles, and also set the capacity for every vehicle.
-
In the Visits tab, you can view and remove locations.
-
In the Route tab, you can select every vehicle and view the route for this vehicle.
6.3. Creating custom data sets
There is a built-in demo data set consisting of a several large Belgian cities. If you want to have more demos offered by the Load demo dropdown, you can prepare your own data sets. To do that, follow these steps:
-
Add a depot and a number of visits by clicking on the map or using geosearch.
-
Click Export and save the file in the data set directory.
Data set directory is where the
app.demo.data-set-dirproperty points to.If the application is running through the run script, it will be set to
$HOME/.optaweb-vehicle-routing/dataset.Otherwise, the property will be taken from
application.propertiesand defaults tooptaweb-vehicle-routing-backend/local/dataset. -
Edit the YAML file and choose a unique name for the data set.
-
Restart the back end.
After you restart the back end, files in the data set directory will be made available in the Load demo dropdown.
6.4. Troubleshooting
If the application behaves unexpectedly, review the back end terminal output log.
To resolve issues, remove the back end database:
-
Stop the back end by pressing Ctrl+C in the back end terminal window.
-
Remove the directory
optaweb-vehicle-routing/optaweb-vehicle-routing-backend/local/db.
7. Development guide
7.1. Project structure
The project is a multi-module Maven project.

At the bottom of the module tree there are the back end and front end modules, which contain the application source code.
The standalone module is an assembly module that combines the back end and front end into a single executable JAR file.
The distribution module represents the final assembly step. It takes the standalone application and the documentation and wraps them in an archive that is easy to distribute.
7.2. Developing OptaWeb Vehicle Routing
The back end and front end are separate projects that can be built and deployed separately. In fact, they are written in completely different languages and built with different tools. Both projects have tools that provide a modern developer experience with fast turn-around between code changes and the running application.
In the next sections you will learn how to run both back end and front end projects in development mode.
7.3. Back end
The back end module contains a server-side application that uses OptaPlanner to optimize vehicle routes. Optimization is a CPU-intensive computation that must avoid any I/O operations in order to perform to its full potential. Because one of the chief objectives is to minimize the travel cost, either time or distance, we need to keep the travel cost information in RAM memory. While solving, OptaPlanner needs to know the travel cost between every pair of locations entered by the user. This information is stored in a structure called the distance matrix.
When a new location is entered, we calculate the travel cost between the new location and every other location that has been entered so far, and store the travel cost in the distance matrix. The travel cost calculation is performed by a routing engine called GraphHopper.
Finally, the back end module implements additional supporting functionality, such as:
-
persistence,
-
WebSocket connection for the front end,
-
data set loading, export, and import.
In the next sections you will learn how to configure and run the back end in development mode. To learn more about the back end code architecture, see Back end architecture.
7.3.1. Running the back end using the Quarkus Maven plugin
-
Java 11 or higher is installed.
-
The data directory is set up.
-
An OSM file is downloaded.
You can manually set up the data directory and download the OSM file or you can use the run script to complete these tasks.
To run the back end in development mode, enter the following command:
mvn compile quarkus:dev7.3.2. Quarkus development mode
In development mode, the back end automatically restarts whenever you refresh the browser tab where the front end runs if there are any changes in the back-end source code or configuration.
Learn more about Quarkus development mode.
7.3.3. Running the back end from IntelliJ IDEA Ultimate
IntelliJ IDEA Ultimate has a bundled Quarkus plugin that automatically creates run configurations for modules using the Quarkus framework. Use the optaweb-vehicle-routing-backend run configuration to run the back end.
Learn more about running Quarkus applications in IntelliJ IDEA Ultimate.
7.3.4. Configuration
The application.properties file
The base configuration is stored in the application.properties file, under /src/main/resources/.
This file is under version control.
Use it to permanently store the default configuration and to define Quarkus profiles.
System properties
To override the default configuration temporarily, use system properties (-Dproperty=value).
The .env file
To override the default configuration permanently, for example to store a configuration that is specific to your development environment, use the optaweb-vehicle-routing-backend/.env file.
This file is excluded from version control and so it does not exist when you clone the repository.
Use optaweb-vehicle-routing-backend/.env-example to initialize your own optaweb-vehicle-routing-backend/.env file.
You can make changes in the .env file without affecting the Git working tree.
See the complete list of Back end configuration properties.
See also the complete list of common application properties available in Quarkus.
7.3.5. Logging
OptaWeb uses the SLF4J API and Logback as the logging framework. For more information, see Quarkus - Configuring Logging.
7.4. Front end
The front end project was bootstrapped with Create React App. Create React App provides a number of scripts and dependencies that help with development and with building the application for production.
7.4.1. Setting up the development environment
-
On Fedora, run the following command to install npm:
sudo dnf install npm
For more information about installing npm, see Downloading and installing Node.js and npm.
7.4.2. Install npm dependencies
Unlike Maven, the npm package manager installs dependencies in node_modules under the project directory and does that only when requested by running npm install.
Whenever the dependencies listed in package.json change (for example when you pull changes to the main branch) you must run npm install before you run the development server.
-
Change directory to the front end module:
cd optaweb-vehicle-routing-frontend -
Install dependencies:
npm install
7.4.3. Running the development server
-
npm is installed.
-
npm dependencies are installed.
-
Run the development server:
npm start -
Open http://localhost:3000/ in a web browser. By default, the
npm startcommand attempts to open this URL in your default browser.
|
Prevent
npm start from launching your default browserIf you don’t want You can use |
The browser refreshes the page whenever you make changes in the front end source code. The development server process running in the terminal picks up the changes as well and prints compilation and lint errors to the console.
7.4.4. Running tests
-
Run
npm test.
7.4.5. Changing the back end location
Use an environment variable called REACT_APP_BACKEND_URL to change the back end URL when running npm start or npm run build.
For example:
REACT_APP_BACKEND_URL=http://10.0.0.123:8081
Note that environment variables will be “baked” inside the JavaScript bundle during the npm build, so you need to know the back end location before you build and deploy the front end.
Learn more about the React environment variables in Adding Custom Environment Variables.
7.5. Building the project
Run ./mvnw install or mvn install.
8. Contributing to OptaWeb Vehicle Routing
8.1. Formatting OptaWeb Vehicle Routing source code using Maven
The OptaWeb Vehicle Routing back end has a strictly enforced code style. Code formatting is performed by the Eclipse code formatter, using configuration files from the OptaPlanner project.
By default, when you execute the ./mvnw install command, the code is formatted automatically.
This is important because when you submit a pull request, the continuous integration (CI) build fails if running the formatter results in any code changes.
Therefore, it is recommended that you always run a full Maven build before submitting a pull request.
-
To run a full Maven build, enter the following command:
./mvnw install -
Optional: To run the formatter without performing a full build, enter the following command:
./mvnw process-sources
8.2. Formatting OptaWeb Vehicle Routing source code using an IDE
You can use Eclipse IDE or IntelliJ IDEA to format the source code without having to invoke the Maven build. This allows you to make small changes and commit often while making sure that the source code is formatted properly and the Maven build is successful after each commit.
You must configure your IDE to use the Eclipse formatter plugin and select the formatter configuration used by the Maven plugin that formats the source code automatically during the Maven build.
The formatter configuration files are stored in the build/optaplanner-ide-config/src/main/resources directory under the root of the OptaPlanner repository.
8.2.1. Eclipse IDE setup
-
The OptaPlanner repository is cloned on your computer.
Complete the following steps to configure Eclipse IDE:
-
Open and then navigate to .
-
Click Import… and select
optaplanner/build/optaplanner-ide-config/src/main/resources/eclipse-format.xml. -
Navigate to .
-
Click Import… and select the
optaplanner/build/optaplanner-ide-config/src/main/resources/eclipse.importorder. -
Click Apply and Close.
8.2.2. IntelliJ IDEA setup
-
The OptaPlanner repository is cloned on your computer.
Complete the following steps to configure IntelliJ IDEA:
-
Open the Settings or Preferences window:
-
For Windows and Linux, select .
-
For macOS, select .
-
-
Navigate to Plugins and install the Eclipse Code Formatter Plugin from the Marketplace.
-
Restart your IDE.
-
Open the Settings (or Preferences) window again and navigate to .
-
Configure the Eclipse Code Formatter:
-
Select Use the Eclipse Code Formatter to enable the plugin.
-
In the Eclipse formatter config section, select the Eclipse workspace/project folder or config file option, click Browse… and then select
optaplanner/build/optaplanner-ide-config/src/main/resources/eclipse-format.xml. -
Make sure the Optimize Imports box is ticked, then select the From file option and browse for
optaplanner/build/optaplanner-ide-config/src/main/resources/eclipse.importorder.
-
Appendix A: Back end architecture
Domain model and use cases are essential for the application. We put domain model at the center of the architecture and surround it by the application layer that embeds use cases. Functions such as route optimization, distance calculation, persistence, and network communication are considered implementation details and are placed at the outermost layer of the architecture.

A.1. Code organization
The back end code is organized in three layers outlined above.
org.optaweb.vehiclerouting
├── domain
├── plugin          # Infrastructure layer
│   ├── persistence
│   ├── planner
│   ├── routing
│   └── websocket
└── service         # Application layer
    ├── demo
    ├── distance
    ├── location
    ├── region
    ├── reload
    ├── route
    └── vehicle
The service package contains the application layer that implements use cases.
The plugin package contains the infrastructure layer.
Code in each layer is further organized by function. This means that each service or plugin has its own package.
A.2. Dependency rules
Compile-time dependencies are only allowed to point from outer layers towards the center. Following this rule helps to keep the domain model independent of underlying frameworks and other implementation details and model the behavior of business entities more precisely. With presentation and persistence being pushed out to the periphery, it is easier to test the behavior of business entities and use cases.
The domain has no dependencies.
Services only depend on the domain. If a service needs to send a result (for example to the database or to the client), it uses an output boundary interface. Its implementation is injected by the CDI container.
Plugins depend on services in two ways. Firstly, they invoke services based on events such as a user input or a route update coming from the optimization engine. Services are injected into plugins which moves the burden of their construction and dependency resolution to the IoC container. Secondly, plugins implement service output boundary interfaces to handle use case results, for example persisting changes to the database or sending a response to the web UI.
A.3. The domain package
The domain package contains business objects that model the domain of this project, for example Location, Vehicle, Route.
These objects are strictly business-oriented and must not be influenced by any tools and frameworks, for example object-relational mapping tools and web service frameworks.
A.4. The service package
The service package contains classes that implement use cases.
A use case describes something that you want to do, for example adding new location, changing vehicle capacity, or finding coordinates for an address.
The business rules that govern use cases are expressed using the domain objects.
Services often need to interact with plugins in the outer layer, such as persistence, web, and optimization. To satisfy the dependency rules between layers, the interaction between services and plugins is expressed in terms of interfaces that define the dependencies of a service. A plugin can satisfy a dependency of a service by providing a bean that implements the service’s boundary interface. The CDI container creates an instance of the plugin bean and injects it to the service at runtime. This is an example of the inversion of control principle.
A.5. The plugin package
The plugin package contains infrastructure functions such as optimization, persistence, routing, and network.
Appendix B: Back end configuration properties
| Property | Type | Example | Description |
|---|---|---|---|
|
Relative or absolute path |
/home/user/.optaweb-vehicle-routing/dataset |
Custom data sets are loaded from this directory.
Defaults to |
|
Relative or absolute path |
/home/user/.optaweb-vehicle-routing/db |
The directory used by H2 to store the database file.
Defaults to |
|
List of ISO 3166-1 alpha-2 country codes |
|
Restricts geosearch results. |
|
Enumeration |
|
Routing engine implementation.
Defaults to |
|
Relative or absolute path |
/home/user/.optaweb-vehicle-routing/graphhopper |
The directory used by GraphHopper to store road network graphs.
Defaults to |
|
Relative or absolute path |
/home/user/.optaweb-vehicle-routing/openstreetmap |
The directory that contains OSM files.
Defaults to |
|
File name |
belgium-latest.osm.pbf |
Name of the OSM file that should be loaded by GraphHopper.
The file must be placed under |
|
java.time.Duration |
|
How long the solver should run after a location change occurs. |
|
IP address or hostname |
10.0.0.123, my-vrp.geo-1.openshiftapps.com |
Network address to which the server should bind. |
|
Port number |
4000, 8081 |
Server HTTP port. |